Miter Saw Will Not Cut Square: Fence, Blade, and Alignment Checks
A miter saw will not cut square for a few different reasons, and the visible symptom can be misleading. A cut that looks like a bad 90-degree miter may actually come from a dull or damaged blade, debris behind the workpiece, a loose miter lock, poor stock support, or a bevel stop that is no longer at zero.
Safety first: Unplug a corded saw or remove its battery before inspecting the blade, fence, stops, or adjustment hardware. Keep the guard installed and functional, wear eye protection for cutting, and never put hands near the blade path.
The most reliable approach is to check simple causes before moving any calibration screws. Do not trust the printed scale or pointer by itself: confirm the blade’s actual relationship to the fence and table with an accurate square. Also, use your exact owner’s manual for the proper adjustment points. The fasteners, stop design, and calibration sequence vary by saw.
Start by identifying how the miter saw will not cut square
Before adjusting anything, make a few test cuts in straight, reasonably flat scrap. Mark the board faces so you can keep track of its orientation. Then check the cut with a reliable combination square or machinist-style square.
- Out of square across the face of a 90-degree crosscut: The miter setting, fence relationship, detent plate, or miter lock may be the issue.
- Out of square through the thickness of a 90-degree crosscut: Check the zero-bevel setting, bevel stop, sawdust on the table, and head play.
- Only angled cuts are wrong: The zero setting may be fine, while the selected miter detent, bevel stop, or pointer is inaccurate.
- The cut changes from one piece to the next: Suspect workpiece movement, a loose lock, blade deflection, unstable support, or a mechanical problem rather than a simple calibration error.
A miter saw that cuts crooked should be evaluated at 0-degree miter and 0-degree bevel first. Establish that basic square cut before trying to correct 45-degree settings or compound-cut results.
Use this diagnostic order before calibration
- Clean the seating surfaces. With power disconnected, clear sawdust, resin buildup, chips, and offcuts from the table, fence faces, detent area, and the workpiece. Even a small chip caught behind a board can push it out of position.
- Check the workpiece and support. Use straight stock where possible. Hold the board firmly against the fence and flat on the table; clamp it when appropriate and when the saw manual permits. Long material needs support at the same height as the saw table so it does not twist, sag, or lever the board away from the fence.
- Inspect the blade and its mounting. Look for pitch buildup, chipped or missing teeth, obvious wobble, a bent plate, or a blade that is inappropriate for finish crosscuts. Verify that the blade is correctly seated and secured according to the owner’s manual.
- Verify that the miter and bevel locks hold. Set the saw at zero, engage the locks, and gently check for movement without forcing anything. A table or saw head that shifts under normal cutting pressure cannot deliver repeatable square cuts.
- Measure blade-to-fence squareness. This evaluates the 0-degree miter setting.
- Measure blade-to-table squareness. This evaluates the 0-degree bevel setting.
- Make new test cuts. Only after cleaning, checking the blade, and confirming the two zero settings should you assess 45-degree detents, pointer readings, or other stops.
Check the blade before blaming the fence
A blade can make a correctly aligned saw appear inaccurate. A dull blade may wander or burn; a dirty blade can cut roughly; and a damaged or warped blade can produce inconsistent results. Cutting too quickly, especially through dense or wet lumber, can also flex the blade enough to leave a cut that looks crooked.
With the saw disconnected from power, inspect the blade carefully. Do not use a square against the carbide tooth tips when checking alignment. Teeth have set and may not sit in the same plane as the blade plate, which can create a false reading. Instead, position the square against a smooth portion of the blade body between teeth.
If the blade is questionable, replace it with a correct, undamaged blade approved for the saw and the material. Follow the manual’s blade-change procedure and confirm that the arbor hardware is installed in the correct order. If a clean, suitable blade still leaves the same error, proceed to fence and bevel checks.
Check whether the miter saw fence is out of square
When people say the miter saw fence out of square, they may mean two different things. The main issue is usually not whether the fence itself is perfectly straight from end to end; it is whether the blade is perpendicular to the fence at the locked 0-degree miter position.
Measure blade-to-fence alignment at zero miter
Disconnect power, set the bevel at zero, release the head lock if necessary, and lower the saw head gently without turning it on. Lock or hold the head in a stable down position as your manual directs. Set the miter position to its 0-degree detent.
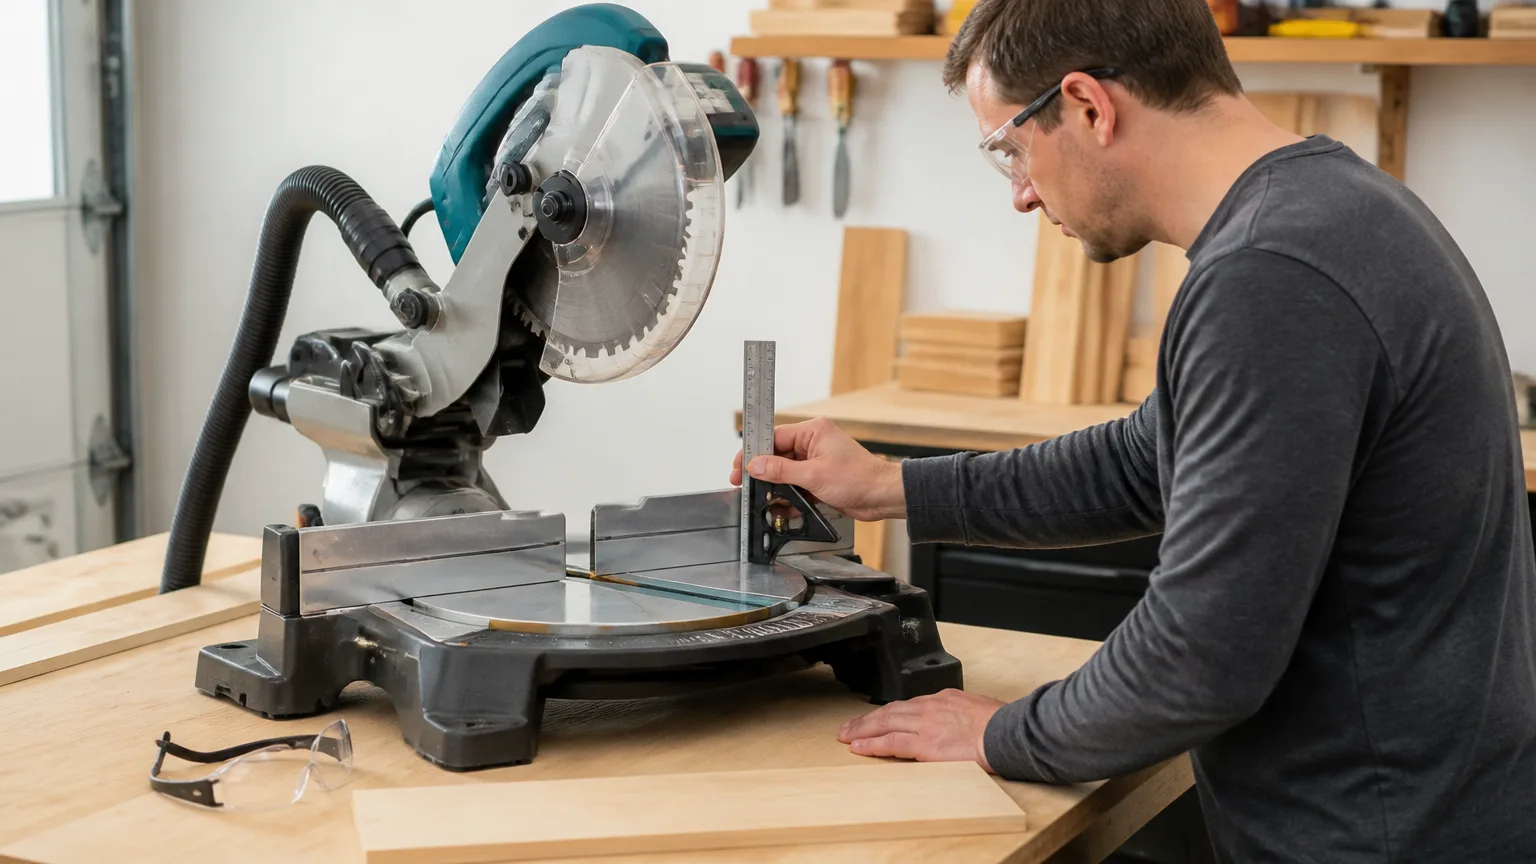
Place one leg of a dependable square against the fixed fence face and bring the other leg alongside the blade plate. Check near the front of the blade and again farther back. Avoid touching teeth. If the square contacts evenly in both places, the blade is square to the fence. A visible gap indicates that the actual miter position needs attention.
Check both fence sections as well. On many sliding compound saws, one or both fence wings move to make clearance for bevel cuts. Those movable sections must be locked securely, positioned for maximum support, and clear of the blade and guard through the complete travel of the cut. A fence wing that is loose or pushed forward by debris can make a workpiece sit crooked even if the main miter setting is correct.
Adjust the actual setting before the pointer
For many saws, how to calibrate a miter saw begins by setting the blade square to the fence at the zero miter detent. The miter scale, detent plate, or related hardware may need to be loosened and shifted slightly, but the exact process is model-specific. Follow the owner’s manual rather than assuming the same screws apply to every saw.
After the blade is truly square to the fence and the relevant hardware is tightened, then reset the pointer to read 0 degrees if needed. The pointer is an indicator, not the reference standard. Confirm your adjustment with another test cut rather than relying only on the square measurement.
Check blade-to-table alignment for an inaccurate bevel angle
If a 90-degree crosscut is square across the board’s face but not square through its thickness, the likely problem is the zero-bevel setting. This is a common cause of a miter saw bevel angle inaccurate complaint.
With power disconnected, place the saw at the 0-degree bevel position and make sure the bevel lock is engaged as directed by the manual. Put a square on the table and run its upright leg beside the blade plate, again staying clear of the teeth. Check for a gap from bottom to top.
If the blade is not perpendicular to the table, locate the 0-degree bevel adjustment instructions for your exact model. Some saws use a stop screw; others use a detent plate, cam, or differently placed adjustment hardware. Set the blade square to the table first, secure the adjustment, and only then correct the bevel pointer if it no longer reads zero.
Do not start with the 45-degree stops. A 45-degree setting is only meaningful after the saw’s zero-bevel reference is correct. Once zero is confirmed, make test cuts at common bevel settings and compare mating pieces. If the angles still do not close properly, consult the manual’s procedure for the applicable bevel stop.
Look for movement that changes during the cut
Repeatability matters. If one test cut is square and the next is not, a loose component or cutting setup is more likely than a static alignment error.
- Confirm the miter lock fully holds the table at the chosen angle.
- Confirm the bevel lock holds the saw head at the selected bevel.
- Check that sliding rails, pivot areas, and fence locks do not have unusual play.
- Make sure the board is not rocking on debris or bowing away from the fence.
- Support long boards without lifting or pulling them while cutting.
- Use a steady cut. On a sliding saw, follow the operating sequence in the manual rather than forcing the blade sideways through the material.
For a sliding saw, inspect alignment with the head in more than one rail position when practical. A discrepancy that appears only with the head extended can point to rail, carriage, or pivot wear. Those conditions may require an authorized service professional instead of a home adjustment.
Make a final test cut before returning to precision work
After each correction, cut fresh scrap at 0-degree miter and 0-degree bevel. Check the face and thickness of the cut with a square. Then make two matching miter cuts and place their cut faces together. If the joint opens, determine whether the error is repeatable and whether both pieces were held against the same fence surface in the same way.
For trim, cabinet parts, and other visible work, cut a small test sample at the real angle and orientation you plan to use. A miter saw can be square at its basic zero settings yet still need its specific detent or bevel stop checked for a particular cut.
If you also notice a slow or malfunctioning guard, brake, switch, or unexpected blade behavior, stop using the saw until that safety issue is resolved. Our guide to safe checks for a miter saw blade brake that is not working covers the appropriate first steps.
When professional service is the better choice
Contact an authorized service professional if the fence is bent or cracked, the table will not lock, the saw head has noticeable pivot play, rails bind or shift, the blade wobbles with a known-good blade installed correctly, or calibration will not hold. Do the same if adjustment requires disassembly beyond the procedures clearly described in your exact owner’s manual.
A miter saw will not cut square is often resolved by cleaning contact surfaces, replacing a poor blade, properly supporting the work, and recalibrating the true zero positions. But consistent accuracy depends on a sound saw with locks, guard, fence, blade, and pivot system all working as intended.